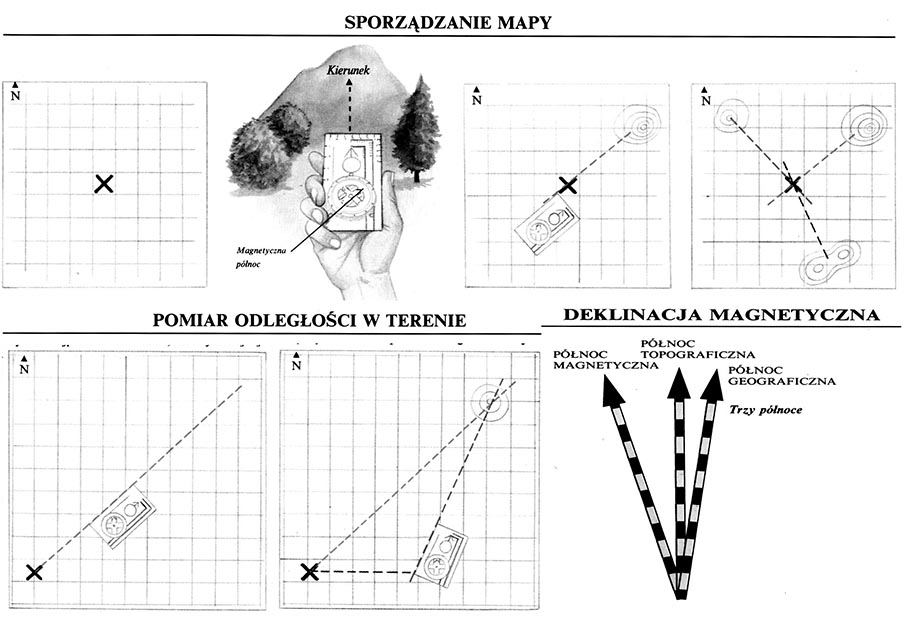
1 On a piece of paper, remove a rectangular mesh with mesh corresponding to one square kilometer of the area of the area. In the middle, draw a cross meaning your position.
2 Find a convenient observation point. Designate azimuth compass, determining the direction of a characteristic point on the horizon. Estimate the distance from this point (Look below).
3 Find the map grid according to the north-south axis and draw a line running from the cross, According to azimuth. Select the hill on the line.
4 Similarly, determine the location of two other objects, visible, in which you are. Your position on the map should be determined by the intersection of the lines coming from them.
Measurement of distance in the field
To determine the location of a given object on the set, You must first estimate its distance from the place, in which you are. You can do it by determining azimuth. Set the direction first, in which the object is located. Then move to the second place, which you can mark on the map. You can measure the distance between them. After determining the direction of the object from the second place, the lines running from both points should be deleted on the map, According to azimuth. At the place of their intersection, you can draw a symbol of the object. Now you can easily calculate its distance from the place with a mesh, in which you are.
1 The presented method allows you to measure the distance from any object in the field both using a ready map, as well as a self -drawn plan. When removing your own plan, attention should be paid, that all rectangular mesh stitches would be the same. First azimuth must be appointed to the selected object, For example, hills. Then draw a line running from a cross (observer) towards the object, According to Azimut.
2 A specific distance should be passed by peeling 90 ° in relation to the north direction, Until a point is reached, in which azimuth will differ to at least 30 ° from the previously measured object. Select this item on the map and designate azimuth and specify it with a line on the map. The hill is at the intersection of both lines. Now you can estimate its distance by counting the rectangular mesh lines.
Magnetic declination
When determining directions and determining azimuths, we make a mistake related to the existence of three different northern directions – magnetic north, North on the map and real north, i.e. geographical. Angle between the north and direction, which indicates the end of the magnetic needle is called a magnetic declination or pervert; It is associated with a difference in the position of magnetic and earthly poles. At high latitudes, it increases significantly, and in the polar countries it can completely exclude the use of a magnetic needle for orientation in the field. Therefore, you should know the magnetic declination occurring in a given area. If it is significant, It must be added or subtracted from a azimuth compass. On many maps, magnetic declination is marked in the legend with three arrows.
Three North – The magnetic north is the north indicated by the compass needle; topographic – marked by the map, North proper is a direction, in which the North Pole is indeed. Magnetic decletion is a corner between the direction indicated by the magnetic needle and the north on the map.
Practical tips
■ The golden rule sounds: "Trust the compass". Many people get lost therefore, that he believes his own more, illusory orientation than indications of a magnetic needle.
■ Always determine azimuth and distance according to your own position.
■ Try to recognize the terrain correctly, The course of mountain valleys and ridges.
■ Find the map using the compass. Then apply to it visible, more important landscape elements, and before setting off, set the direction of the march and peel the proper azimuth.
 MAP Preparation


