Basic nodes
 Flat
Flat
1 By binding the flat node, start by postponing the right end of the rope above and at the left end.
2 Then the left end will be over and over the right, holding both ends firmly, As you can see in the photo.
3 Ściągnij węzeł pociągając za oba końce w przeciwnych kierunkach. Such a node can also be tied in the opposite direction. Remember, to always translate this end the second time, from which it began.
 Rescue node
1 This node allows you to create a loop from the rope, which will not be solved, nor will it be tightened. First you have to make a small loop on the line, and then as in the saying: "He came out of the rabbit's burrow, He flew around the tree and returned to the burrow ".
2 Koniec liny (rabbit) Transfer the loop through the loop (nora), Then we lead behind the rope (tree) over the knot and back, we will curl through the loop (nora).
3 Ciągniemy za koniec liny i linę zaciskając węzeł. This node is often used to bind the rope at the waist and belaying, That is why it is worth learning to tie it.

 EIGHT
EIGHT
1 This node allows you to make a loop, which can be wrapped, For example, a branch, how it allows you to connect two ropes. Make one loop with a diameter of about 60 cm, so that the end of the rope goes out.
2 Roll out the loose end over the rope and the loop, and then transfer from below through the loop, so that the rope forms the eight.
3 Pociągnij linę z obu stron, To tighten the knot. In this way you will receive the simplest variety of the eight, which you can tie at the end of the rope.
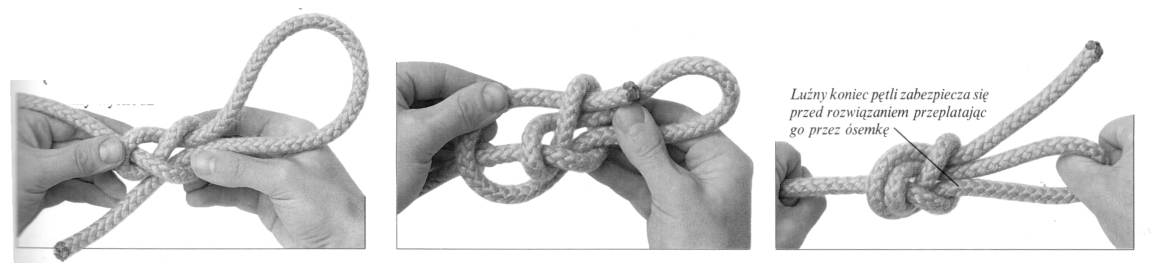
4 Aby zrobić pętlę, Loose the end of the rope wrap around an object, and then stick it back into the eight.
5 Przeciągnij luźny koniec przez ósemkę i zawijając go przełóż z powrotem przez pierwszą pętelkę ósemki.
6 Zaciśnij węzeł ciągnąc z jednej strony za linę, and on the other behind the loop. This node is often used by climbers to bind the rope.


